DLP Progress Report

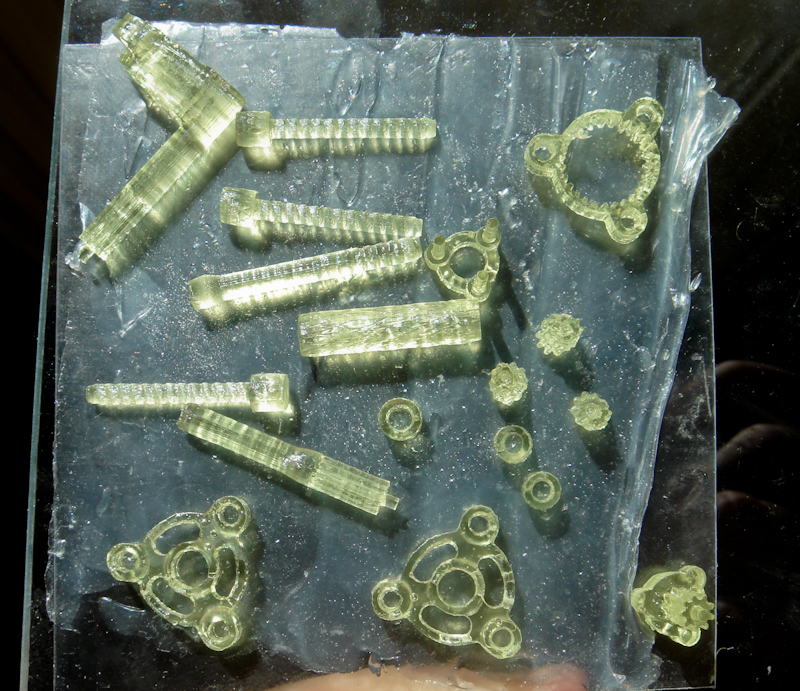
Failed attempt at Tiny Planetary Gears at 80% scale
I had hoped to have some nice successful prints to show off but progress has been rather slow. Vat #2 also developed cracks shortly after the initial test runs. Whilst assessing the situation I made the uncomfortable realisation that the "perspex" I had bought was not actual perspex but rather polystyrene! A project manager from a previous job once dealt me some sage advice: "Assumptions are the mother of all fuck-ups". Here I had assumed that the transparent sheets of plastic at the local hardware store were perspex, because that's what I was looking for and that's all they had, and it certainly looked and responded like perspex. On making this realisation I fell immediately into a second trap - that the cause of the vat failure was due to the material. So I merrily went off and found some real perspex and rebuilt the vat, which promptly failed in exactly the same way!
I recount all of this because I find it interesting how we have to deal with such traps and set-backs as part of the development process. We constantly have to fight against our own hubris, ego, and our willingness to mislead ourselves as we try and maintain focus on solving the current problem, whatever it may be. Robert Pirsig wrote about set-backs and hang-ups, as "Gumption Traps" in Zen and the Art of Motorcycle Maintenance (PDF, p.139 onwards) and I am reminded of them often as I tinker.
So, after 3 failed vats, I actually started to consider that the design might be the problem. Some rudimentary research on working with acrylic showed quite clearly that it "has a high thermal expansion coefficient compared to traditional glazing materials and allowance within the frames must be made in both directions for thermal expansion and contraction". So the rapid heating of the center from the reaction in the resin, together with the use of bolts through the material, was a recipe for disaster. I had, once again, assumed that my memory of working with perspex (at school, so now a few years ago) was accurate and that it would tolerate such temperature changes and design. It was only after these failed attempts that my hubris was sufficiently dented that I was forced to question my assumptions and check, and double check, my work.

Vat #4
Build #4 removes the bolts and leaves some allowances around the edges for the thermal expansion. It uses aluminium U-bar to "clamp" the PTFE foil between the L-shaped walls and the perspex floor. All held together with a generous amount of silicone. It's still far from perfect, but at least so far it hasn't developed cracks! The main problem I foresee is that any damage to the foil will mean having to destroy and rebuild the whole thing.
I also built a second base from copper pcb. So far it seems to hold the parts enough for the duration of the print and they can be easily scraped off afterwards.

New vat and base
During the times that I did have a vat, I attempted the Tiny Planetary Gears by Auebenc. I'm still waiting for my pigment to arrive and so am still trying to judge the cure depth of pure resin by timing alone. Because of this I wasn't expecting a working print (which I indeed didn't achieve) but I think the model shows the potential of what the printer will eventually be able to do.

Failed attempt at Tiny Planetary Gears at 50% scale, note the M3 nut for scale.
The above print would have been great however I had reduced the X/Y scale to 50% but failed to reduce the Z layer height, and so it is elongated x2 in the Z direction. I think I will have to put a reminder message in the host, or do something automatically, as it is all too easy to forget a variable whilst making adjustments such as this.
Sunning the parts as a post-cure
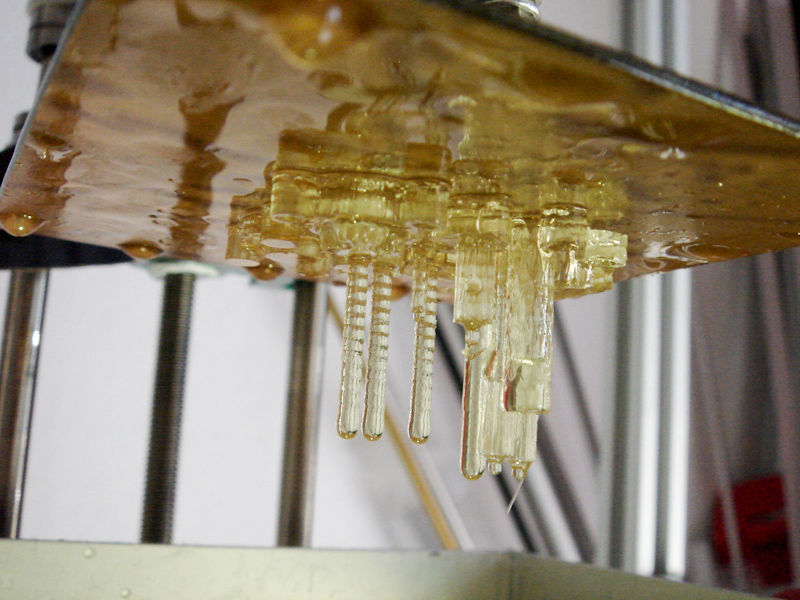
Fresh from the vat

Cleaning with Isopropyl Alcohol
Tony Buser asked what the durability of printed parts is like and I replied that the belt pulley from the first test run certainly appear to be strong enough to use in that capacity, and these prints remain as strong now. One thing I did discover whilst attempting to clean up some of the planetary gear parts is that the material is very brittle directly after printing, and even after a couple of minutes under a UV lamp. When I tried to enlarge screw holes the resin cracked or crumbled quite easily. However it has to be noted that the models were ridiculously small (I printed at 50% and 80% of the already tiny size), plus I think that allowing the models to cure over time makes them stronger.

Brittleness directly after printing
Another thing worth remembering is that spotamaterials also offers harder, more robust resins - Spot-HH and Spot-HT. I will no doubt be trying this sometime soon.
Comments
-
Mike Joyce
11-07-2012 06:48
Nice work Gary! I think adding pigment will really help control your layer thickness and horizontal "cure bleed" issues.
-
Nick Harper
18-09-2012 07:42
You talk about a 50 Deg temperature rise in the resin when exposed. I don't know much about these resins but I do have some experience of DLP projectors. They throw a lot of heat out of the lense. When you removed the colour wheel, you may have also removed the IR filter. If this is the case, I'd also worry about your DLP chip which is now being exposed to the full IR inferno of your lamp.
-
Gary Hodgson
18-09-2012 10:53
Hi Nick, The projector is unmodified, I didn't remove the colour wheel nor any filters, and as I said in the original post: I performed the temperature change test in sunlight, rather than with the projector. Your warning about removing the IR filter is definitely worth bearing in mind for anyone planning on modifying a projector though.
-
Fritz
04-12-2012 22:48
Hi,
great work! Have you got a link for the PTFE foil?
Thanks!
-
Gary Hodgson
04-12-2012 23:42
Hi Fritz.
The PTFE foil can be found here: http://uk.rs-online.com/web/p/insulation-films/5363980/
Since this post I ordered some thicker (0.127mm) (and more expensive) foil because the original is quite easily torn (http://uk.rs-online.com/web/p/electrical-chemical-insulating-films/5363996/)
Sadly I have yet to find time to actually try the thicker foil yet.
-
Fritz
05-12-2012 14:50
Thanks for the reply. RS is alwasy good, easy to get here in Germany :-)